Sunday, October 29, 2017

Digital Dance:

Dance to me is the expressive movement of the human body in space sometimes accompanied by music and rhythm.  Dance always adjusts to its settings. It was no surprise to see that 21st-century choreographers are including digital technologies to their performances.  I am not sure if computer or robots even puppets are in the same league as the natural human expressive and unique movement.  To me seeing another person dance enriches and refreshes my feeling towards humanity.  


I used YouTube to search for a dance group that uses digital art. The first search presented me with America Got Talent video of a piece called Freckled Sky. The team presented what seems to be a new form of entertainment they were using high-end image projection technologies. Val Syganevich is the founder of and creative director with Jalen Preston and Olga Sokolova as dancers.


The dancers in the performance on America Got Talent interacted and were engulfed by digital projections and TV screen, as they appear to vanish and cross the boundaries between projection and reality. At one point, they appeared soaked it water while covered with digital rain. The audience and judges of the show were impressed gave the performance the highest compliments.I enjoyed the show but I thought it was too short and too fast to allow me to fully appreciate the new medium and artistic treatment.

I always loved modern dance, one of my favorite movie is Pina a documentary film, 2011 by filmmaker Wim Wenders who filmed dancers in motion as a tribute to legendary choreographer Pina Bausch, who died in 2009. I found her modern dance so rich and her choreography manages to capture the richness of human experience with direct impact and extreme simplicity and grace. In comparison, the elaborate work of technology that I saw in Freckled Sky pieces did not impress me with dance but with digital technology.


Luckily the YouTube algorithm recommended Enra to watch next. This Tokyo based dance company performs with digital projections at a natural dance speed. This dance company uses graphic projections as an interactive part of their choreography. They dance with projected shapes and designs. They make the viewer believe that they are underwater or have the power to lift huge spheres of light while gracefully dance on stage. The company used gymnastics and circus art to create innovative and masterful new dance forms. The digital projection help elevate the dance form and excited the audience


In the video, the piece above the scale play between the dancer and projections is not seen in traditional dance and the use of digital paintings and even martial arts are unusual and pushes the art form to new levels. 

References:

http://enra.jp/works

http://sfglobe.com/2015/08/31/mbC/

https://randomwire.com/dancing-with-light/

https://www.nytimes.com/2017/09/12/arts/dance/pina-bausch-bam-tanztheater-wuppertal.html


Tuesday, October 24, 2017

Khader Final Proposal for Digital Art Project

Khader Final Proposal for Digital Art Project:

October 24, 2017

3D Space, how is it created? How are virtual reality environment is rendered and what makes objects and characters move and look natural.


Project Overview:

My project aims to demystify the process of creating 3D objects in digital spaces. I will explore the mathematical history of these shapes (platonic solids) then I will show the most basic techniques for making these shapes using computer software. I will use AutoCAD, SketchUp and Maya software to show the overlap and the diversity of methods to create the same basic shapes. All these software allow exporting to virtual reality and to 3D printing.  
I teach college-level courses on subject Computer-Assisted Design (CAD). I discovered that most of my students did not learn about the relevance of geometric shapes and their real-world applications. We have been watching computer modeled reality on TV and in the movies. We experience these shapes in virtual reality. Most people don’t know the process that leads to these creations.
 Action Plan
I hope this introduction video that I will finish by the end of this term will cover the most basics of shape creation methods and help viewers understand how these complex 3D realities are made. I will start with square and triangles then I will introduce circles. Eventually, all my shapes will move from 2D to 3D.


The next step, I will show how the software applies surfaces to wire-frames. This effect makes the shapes appear more real than a line-drawing. In later stages, we shall cover how to apply colors and textures on these surfaces.
I will show how perspective is used to create an illusion of spatial depth. I will explore how Renaissances artists used perspective and how that affected our understanding of the world around us.  


In later stages, I will be creating solid shapes and moving them in space that will make my environment feel as if we are traveling in a move set. I will then add lighting and reflections to render the scenes the way we see in our human eyes.

I am learning Maya which is a great software for creating characters that are much more complex from a geometric point of view. A detailed human face as seen below is made of hundreds of small polygons and surfaces then the software round the edges to make it more organic.


Finally, I want to introduce the viewer to the process of making these forms appear alive by moving their bones and facial features. As you can in the diagram below each major bone is connected into a hinged skeleton frame and then programmed to move based on the natural movement of the human body. This requires solid understanding of human anatomy. An aniamtor has to master so many skill and act as a choreographer and a painter.


I hope I can eventually reach this level of creating a facial character that expresses human feeling as in this model.

This new generation comuter models can learn how to reflect the facial expression of normal people


Timeline:

Weeks 1-2:
Brainstorming – Coming up with idea and methods that I can use and apply? How this video will take from and what is my storyboard?
Weeks 3-4:
Learn Maya and Filmora Video. I am finding Maya much more challenging than any design software that I have ever used . I hope to get the levels I need to by week 12
EDITOR
Weeks 5-6:
I will start building all the materials for telling the story of 3D shapes. I will record video animation of each stage.
Weeks 7-8:
Assembly of different sections using Filmora, making sure that my story line is clear and that my graphics appealing visually.
Weeks 9-10:
Creating the hardest part of the show. Human characters with bones and faces
Weeks 11-12:
Edit/Publish – the film parts that I have been creating throughout the process. Adding music and voice over to explain each step. Adding close captions, creating titles and credit. Using references.
Budget:

I will be using Maya which I have a free access to and several other software that I won on my laptop. I will buy Filomora it is $50 and is worth it. I used the copy at my wife’s Mac and was pleased with the results.  

Sunday, November 27, 2016

Assessment Plan for 3D Building With SketchUp Class

Assessment Plan for 3D Building With SketchUp Class

http://3dbuildingsketchup.weebly.com/

I designed my online class using Weebly. The site objective is to create a 3D Literacy learning environment that is user-friendly, fun, and engaging. 

My class was designed to be synchronous, which I chose due to the high drop-out rate in asynchronous classes. According to Pedro and Johnson, students leave classes when they feel that the learning environment is too de-personalized. I made my class personal by scheduling a weekly Zoom meeting where we can create a community of learners. I also added a Join.Me meeting that will supplement my video instruction. I even modeled a character, Vitruvius, which will be in every 3D model and be a companion teacher.  

I designed the class with the idea of redundancy, to have multiple ways of accessing the materials. The repetition and multiple instructions will ensure that I can be a supportive teacher. I wanted my class not to be overwhelming, I divided my first project into a three-week challenge. I delivered most of my education materials using video instruction delivered via YouTube. This will allow the students to watch and follow step by step.  My videos are relatively short (less than 10 minutes). Students are encouraged to pause and rewind as needed.


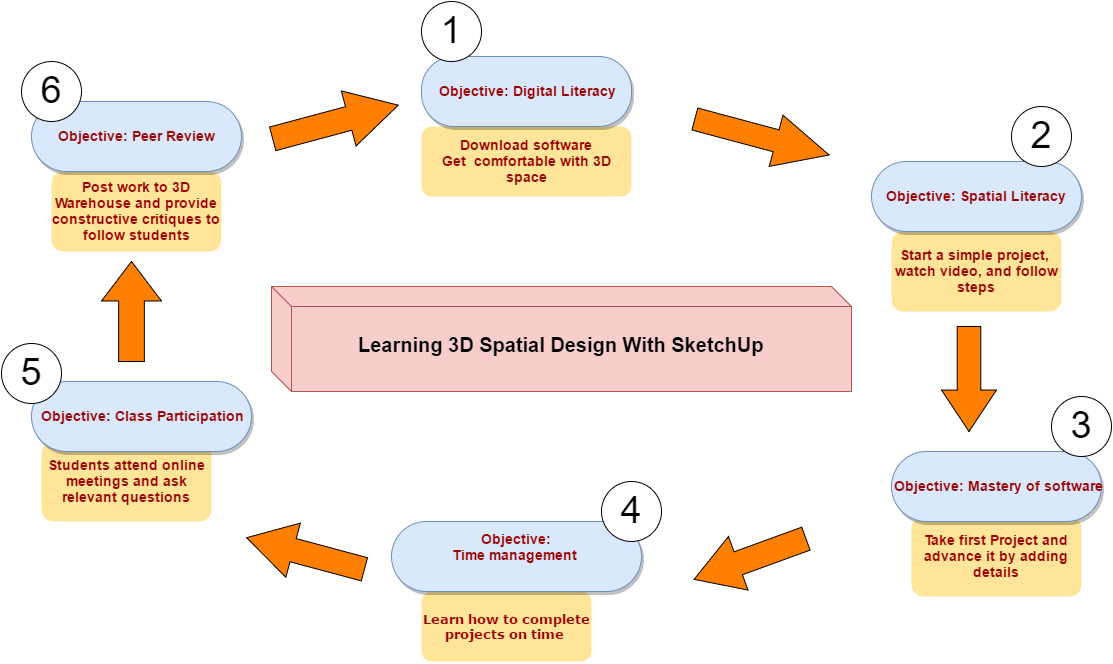
To decide how to help my peer assess my classes, I devised  the diagram below that presents my learning objective, tools, and instructional methods.   


I have six basic objectives:

Objective One is to teach Digital Literacy. 
I  train the students to download software and install it on their computers. So many of my students are not competent at saving files and naming them.  I demonstrate in my class how to download and upload files. I show how to participate in 3D world by uploading and downloading from 3D Warehouse (an online site for sharing 3D objects). 


Objective Two: is to teach Spatial Literacy.
 In Sketch Up a person can design a spoon or an entire city. Being able to model objects in 3D is a useful life skill with many application in the sciences and arts. I demonstrate how to use the mouse to navigate space,  pan, and zoom. Most 3D applications and virtual reality environments have similar tools. I show how easy it is to build a simple object, copy it, then move it in space.

Objective Three  is to teach students how to use SketchUp.
SketchUp has specific methods for work. In my video tutorials, I explain the tool pallet and how to use it. I show a practical workflow. I build the skills each week and keep adding skills to the students' toolbox to create more complex projects. 

Objective Four is to teach students time management.
In a fast-paced world, projects need to be completed on time. Since each week will depend on the skills acquired the week before, I will make sure students keep up with the assignment schedule. I will make sure that they find enough time to practice and send the work to me so I can assess it and give them feedback. 


Objective Five is to teach participation and engagement.
Most students don't use their classmates as supportive members of a learning community.
In this my class we will be  encouraged to teach each other. The site will have a discussion area.

Objective Six is to help students learn how to evaluate their own work and how to give constructive feedback to their classmates. 
I will share the rubric and explain how they can evaluate themselves and others.


The students will be assessed on three fronts.

Class participation will count for 20%
Attending online meetings
Attending the Join.me sessions


Students' projects  will count for  60%
Quality of the drawing accuracy
Use of Groups
Creativity 
Delivery on time

Students' feedback to each other 20%
 Peer reviews will take place in the 3D Warehouse, and in the discussion area


This is a detailed rubric for grading the castle projects


RUBRIC for Castle in SketchUp 

Project evaluation
Excellent 
 effort
Meets 
 expectation
Satisfactory
Base line skills
Minimal effort
No work
Student produced the Castel in 3D as shown in tutorial accurately.
5
4
3
2
1
0
All objects remind blocks
5
4
3
2
1
0
Doors and windows were opened
5
4
3
2
1
0
Color added to decorate the shapes
5
4
3
2
1
0
Student's name added in 3D
5
4
3
2
1
0
File added to 3D warehouse
5
4
3
2
1
0
Students gave constructive feedback to two students
10
7
6
4
2
0
Student participated in Zoom meeting
10
7
6
4
2
0
Points
50


TOTAL POINTS


At the end of the course, I will review everyone's assignments and see if the students have learned the proposed lessons. If there are gaps in learning, I have to revise my lessons to serve my learners better.


I used: https://www.draw.io/ to create my diagram, Great tool.   


References :

Willging, Pedro A., and Scott D. Johnson. "Factors that Influence Students' Decision to Dropout of Online Courses." Journal of Asynchronous Learning Networks 13.3 (2009): 115-127.

Saturday, November 19, 2016

Artifact from my teaching life

I have been using websites as part of my teaching for the last 5 years. My community college students benefit from having an online place to go to regularly and know what we are studying and have links to assignments, essays, syllabus, and instructional videos.  I consider my classes blended learning environments. Students can work at home and continue to learn by themselves.

I use Weebly.com. This company allows students and teachers to have free websites.  I encourage my students to make digital portfolios using Weebly or whatever site-building source they choose. This is an example of one student's digital portfolio: http://fortunatoiodice.weebly.com/my-work.html


This is my site: http://sketchup106.weebly.com.

Currently, my class is learning about building science and is researching green building resources.
My website has many links to YouTube videos and articles on the subject.

A large percentage of my students get overwhelmed by subjects that are open-ended and they resist learning by exploring.  I keep reminding them of the assignment goals.

My specific student population needs my in-class presence and constant support. Their years of education did not prepare them to be self-driven learners.  This semester, I am developing strategies to make sure I have my students' attention and focus. I take them into a conference room and insist they leave their digital devices in the computer lab. I have to model for them what a fact-based discussion looks like and make sure they take notes using pen and paper.


I have a link to my syllabus  at the home page: http://sketchup106.weebly.com/home.html

I have a rubric to show how projects should be graded:


Sunday, October 30, 2016

Storyboard using Prezi

For my project, I choose a character that is both historical and is popular in Lego world. This character is a master builder and a perfect cartoon teacher. His name is Vitruvius  and I created a 3D model of him in SketchUp.

Vitruvius is going to be the instructor and will show learners how to do most of the basic SketchUp commands. My idea is to present SketchUp in a friendly and accessible way. In using Lego as a metaphor and as a vehicle for teaching 3D design, the intention is to remove the inhibition that most people experience when trying to learn new software.

I will deliver my lesson on the class website and there I will make videos animation using Vitruvius to help explain and demonstrate: http://3dbuildingsketchup.weebly.com/


I created  a simple storyboard that shows several frames of how this instruction may look.


The intention is to create a whole narrative of all the skills each lesson will cover.
And have and outline of the full structure of my course. 


Storyboard using Prezi

For my project, I choose a character that is both historical and is popular in Lego world. This character is a master builder and a perfect cartoon teacher. His name is Vitruvius  and I created a 3D model of him in SketchUp.

Vitruvius is going to be the instructor and will show learners how to do most of the basic SketchUp commands. My idea is present SketchUp in a friendly and accessible way. In using Lego as a metaphor and as a vehicle for teaching 3D design, the intention is to remove the inhibition that most people experience when trying to learn new software.

I will deliver my lesson on the class website and there I will make videos animation using Vitruvius to help explain and demonstrate: http://3dbuildingsketchup.weebly.com/


I created  a simple storyboard that shows several frames of how this instruction may look.


The intention is to create a whole narrative of all the skills each lesson will cover.
And have and outline of the full structure of my course.